Read Review

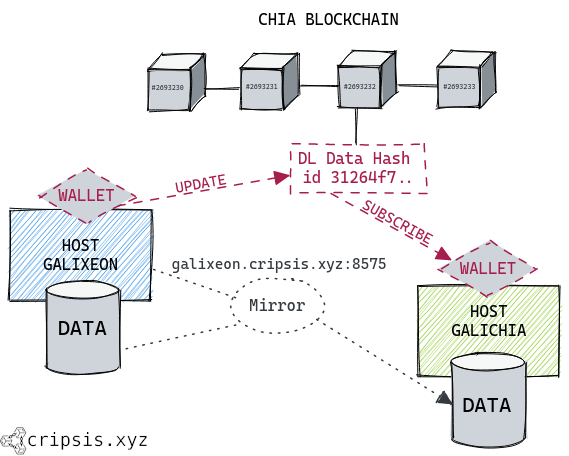
In the last article, we talked about Chia DataLayer, a general use and public decentralized database that means a technological paradigm little seen since then.
Introduction
It’s the moment to get down to work and start working on a basic stage where we have two hosts with an installation of the official blockchain of Chia.
The steps will be realized through a Command-line interface (CLI) in a Linux environment.
One of the hosts will be shaped as a publisher and create a datastore and a mirror when we post raw data. The other host will be shaped as an observer and will be subscribed to the previously created datastore, then, we realized tests to check the data synchronisation.
1. Requirements
Instructions for both hosts
- Two Linux machines with the distribution of your choice, prepared with the latest available version of the Chia blockchain. Clone the Chia-Network/chia-blockchain git repository to a directory (e.g. in /etc).
sudo git clone https://github.com/Chia-Network/chia-blockchain.git /etc/chia-blockchain- Install it following the instructions of the wiki depending on the distribution that corresponds.
- For each Chia installation, have a standard wallet synchronized (it is not necessary to have a synchronized full node).
- Choose the host and wallet that will create the datastore and make sure you have at least 0.1 XCH (100000000000 Mojo) in it as they will be needed to create the datastore. If the amount is not available, it is recommended to follow the instructions below to achieve this in approximately 10min.
- A mirror will be available on the publisher machine for the data publishing process, make sure there is no firewall interrupting incoming communications to TCP port 8575 on that machine.
As an example, the galixeon machine will assume the role of publisher and galichia will become a subscriber.
We access the publisher machine via a command-line interface, locate ourselves in the directory where the chia-blockchain repository was cloned, and activate the Python virtual environment with the command . ./activate.

chia init command and follow the instructions to generate the initial configuration and generate the key strings necessary for blockchain operation.2. Enable services
Instructions for both hosts
To interact with the parties involved inDataLayerfunctioning, it is necessary to enable wallet and data services, using the following command:
chia start data wallet
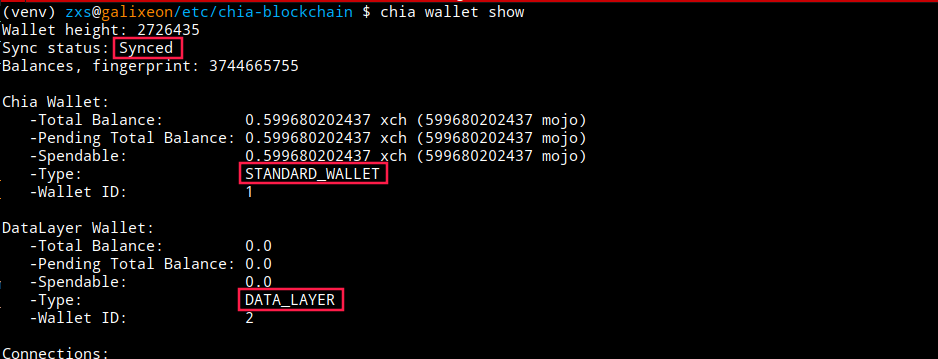
3. Wallets check
Instructions for both hosts
Once the services are started, we verify that we have two wallets: A STANDARD WALLET and a Data LAYER wallet. The wallets must be synchronized with the Chia network, otherwise,it will not be possible to perform network operations. We execute the following command:
chia wallet showIf the word Synced appears we are ready to operate, in case the status wasSyncing, it is necessary to wait for it to finish synchronise.
chia wallet get_address.4. Create a datastore
Instructions for publisher host
Okay! We are ready to create our first Chia datastore. We have just to execute the following command:
chia data create_data_store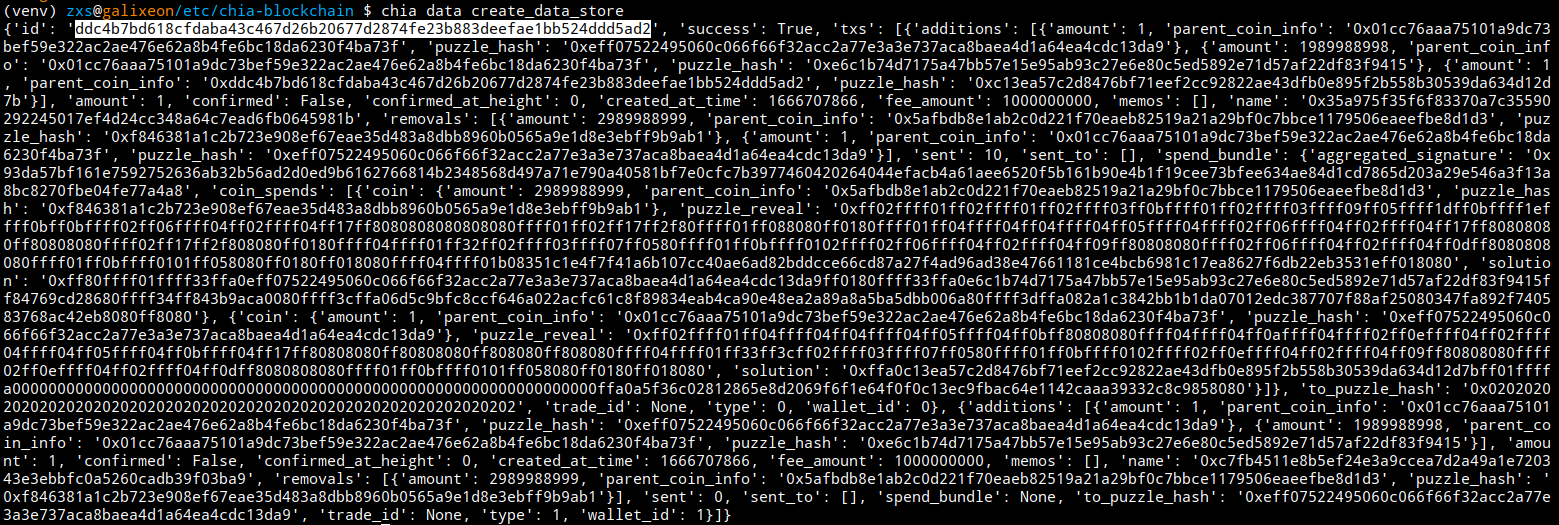
We'll see a lot of information in the output; if everything went right, it will be very similar to the previous capture. We'll just keep the datastore ID, copy it and save it.
If you need to consult again the datastore ID, run chia data get_owned_stores.
5. Hello World
Data publication
Instruction for publisher host
We return to our Publisher host and we will try to create a dataset to test the replication process. To do this we will publish a key-valuedata set. Data travelling through the Data Layer can only be of a hexadecimal type so everything we want to publishonthe data repository will need to be transformed before sending it.
Simply adapt the DATASTORE ID, KEY and VALUE variables to the desired values, copy and paste the instructions to create a simple data entry. The xxd command is responsible for converting to hexadecimal in the correct format.
DATASTORE_ID="ddc4b7bd618cfdaba43c467d26b20677d2874fe23b883deefae1bb524ddd5ad2"
CLAVE="CRIPSISXYZ"
VALOR="HOLA MUNDO!"

chia data update_data_store --id=$DATASTORE_ID -d "[{\"action\":\"insert\", \"key\":\"$(xxd -pu <<< $CLAVE)\", \"value\":\"$(xxd -pu <<< $VALOR)\"}]"
The output must contain the field {'success': True}. We can observe the key tx id that indicates the transaction identifier, which is public within the blockchain.
You can view the transaction status and related details by searching for the transaction ID on xchscan.com.
Data inclusion check
Instruction for publisher host
We will verify that the data has been included in the blockchain and that the unique hash that identifies the change and its content have been generated:
chia data get_root_history --id=DATASTORE_ID
As we can see in the output, we have a json with three elements (the first element is the root and always autogenerated), which are the number of transactions that have been generated for that datastore and each element, if the transaction is confirmed, the inclusion proof (the hash) and a timestamp of when the transaction was validated.
6. Mirror creation
Now that we know how to log transactions within the blockchain and check their inclusion, it is time for the data from the datastore willbe replicable to other chia nodes. To do this it is necessary to create a mirror that pointsto the identifier of the datastore which we will connect retrospectively from the host subscriber.
Start the service
We start by starting the mirror service called data_layer_http which will be available through TCP port 8575. If you have a domain name that points to the publisher machine, you can use that name. Otherwise, use the public IP directly.
chia start data_layer_http
Add the mirror
We run the following command in which we specify whit -i the ID of the datastore, with -u the FQDN or IP that points to the host and whit -a small number of Mojos. This parameter serves to decide the choosing priority of the mirror in the case of having multiple mirrors for a datastore.
chia data add_mirror -i DATASTORE_ID -u http://NOMBRE_O_IP:8575 -a 1000
7. Subscribe to the datastore
Instruction for subscriber host
Now it is the turn of the subscriber machine to subscribe to the newly created datastore and mirror. To do this, run the following command and replace STORE ID with the previously created datastore ID:
chia data subscribe -store STORE_ID -u http://NOMBRE_O_IP:8575
Data inclusion test
Let's verify that the data has been successfully replicated through DataLayer, from the subscriber host. We run again:
chia data get_root_history --id=DATASTORE_ID
As we can see in the output, we have the same json with the root element and the two transactions that we have previously generated. That means that the changes are already spread to our node.
8. Reading data
Now that we know the data is available, let's try to visualize it. Using the following command we will see the raw data in hexadecimal:
chia data get_keys_values --id=STORE_ID
We see two elements inside the json array, with their key-value relationship. If we wanted to view only the available keys, run:
chia data get_keys --id=STORE_ID
If we want to know quickly the decryption value of a hexadecimal field, simply run the xxd command again with the parameters to revert. For example:
echo 0x4352495053495358595a0a | xxd -r -p
And ready! Now we understand how Chia data replication works.
Creating and sharing quality content takes time and effort. If you appreciate my work and would like to see more of it, please consider making a small donation.
Every contribution, however small, makes a big difference and helps me continue this work that I enjoy so much.
If you have any kind of suggestion or would like me to talk about a specific topic, let me know!